
How To Use Find and Replace in Word: A Step-by-Step Guide
Discovering you’ve spelled a client’s name or a software component incorrectly throughout a document can be frustrating, especially when you consider the time it will take to go through the document and manually change each error.
Thankfully, Microsoft Word has a “Find and Replace” feature. This highlights each instance of the incorrect word and allows you to change each instance of the error to the correct word, simultaneously.
What is find and replace?
Find and replace allows Word users to quickly find words, phrases, or symbols within a document, and then replace them with something else. This is useful for making a quick change across a large document. For example, you may have changed a particular branding statement and need to update it quickly across a massive file. Searching manually takes a long time, plus it's prone to human error. The find and replace function ensures no instance of the incorrect text is missed, and gives users the opportunity to replace the incorrect text with exactly what’s needed.
Find and replace text in Word
There are different ways to find and replace text in Word. One uses the menus within Office, and the other uses keyboard shortcuts. We’ll start with the standard method which involves using the Microsoft Word menu interface.
How to find text in Word
First, make sure that you’re on the “Home” tab on the Microsoft Word screen.
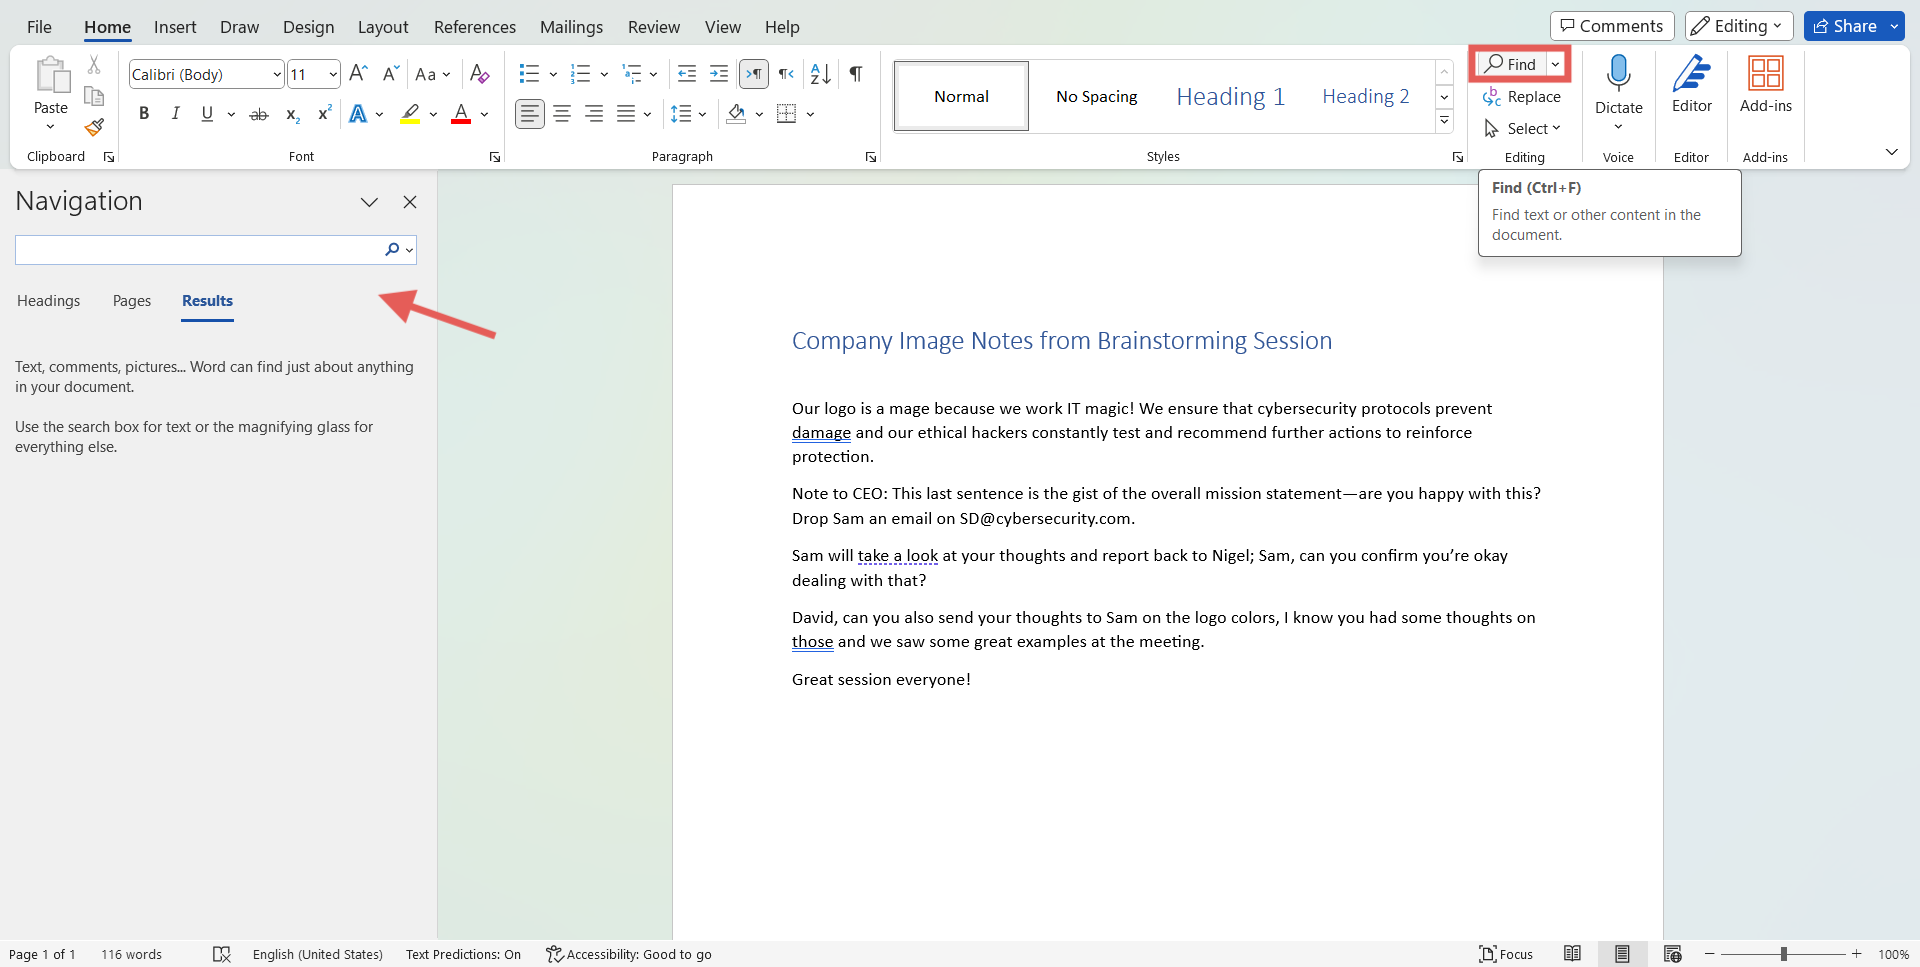
1. Click “Home,” and look to the right of the bar beneath the tabs. Just to the right of “Styles” you should see three options in a vertical list: "Find," "Replace," and "Select."

All screenshots provided by the author, captured on Microsoft 365 Word version 2310, 2023.
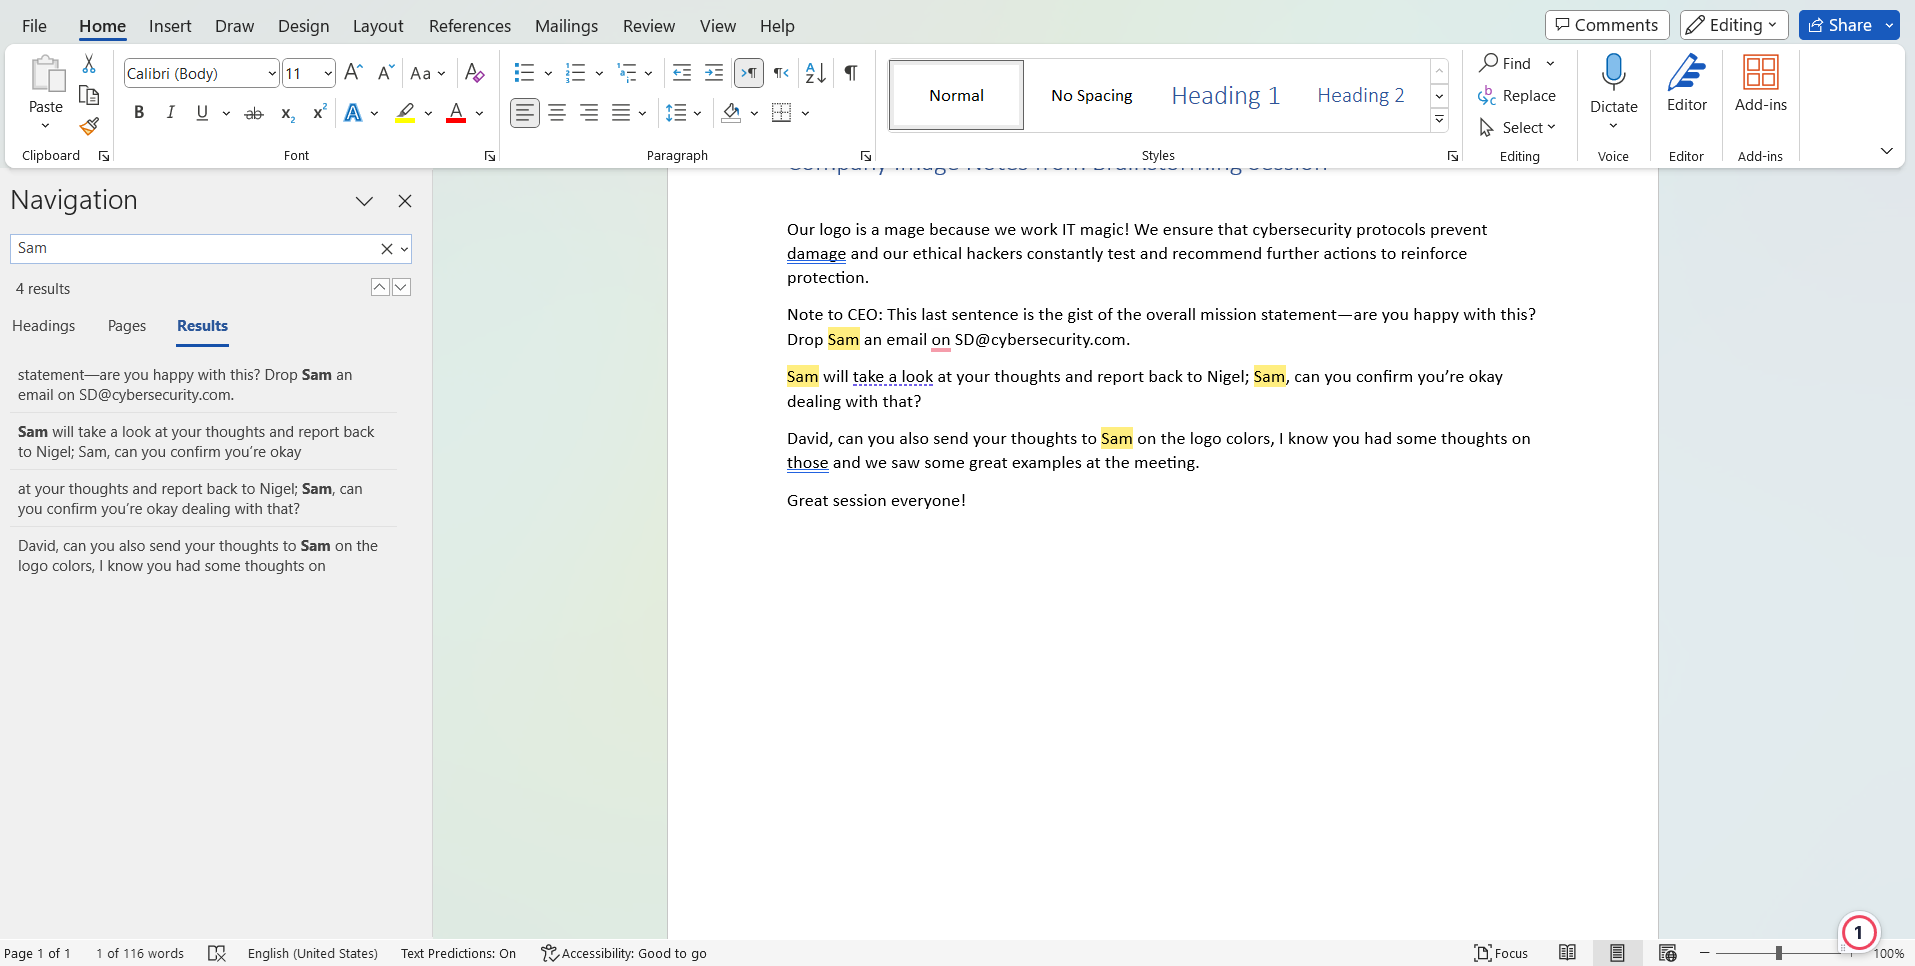
2. Click “Find.” This opens up a panel called Navigation at the left of the screen. Click anywhere in the text box in the navigation panel and type the word or phrase you want to find. Press “Enter.”
3. Microsoft Word will now find and highlight all instances of that text. You’ll see each instance highlighted in the main text and also listed in the Navigation panel, which you can use to quickly move to any instance of the found words.
Note
You can also use the “Search” bar at the very top of your Microsoft Word window. However, this offers multiple functions other than “Find,” including opening files and folders containing your chosen word or phrase. Using the menus or shortcuts is more generally more efficient.
For Mac users: Look under the “Edit” tab rather than “Home” for the “Find” option, which then opens up “Replace” and other functions.
How to replace text in Word
Now that you’ve found all the instances of your text, you want to change it.
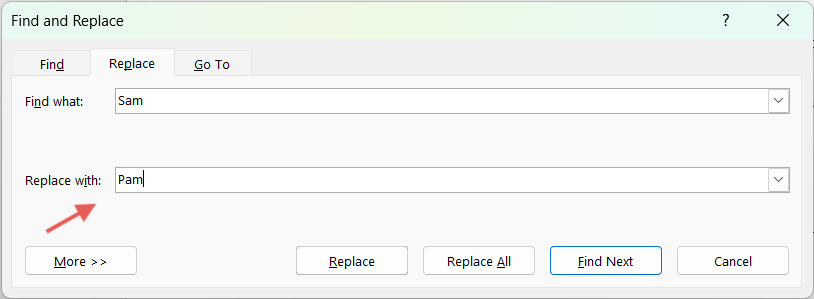
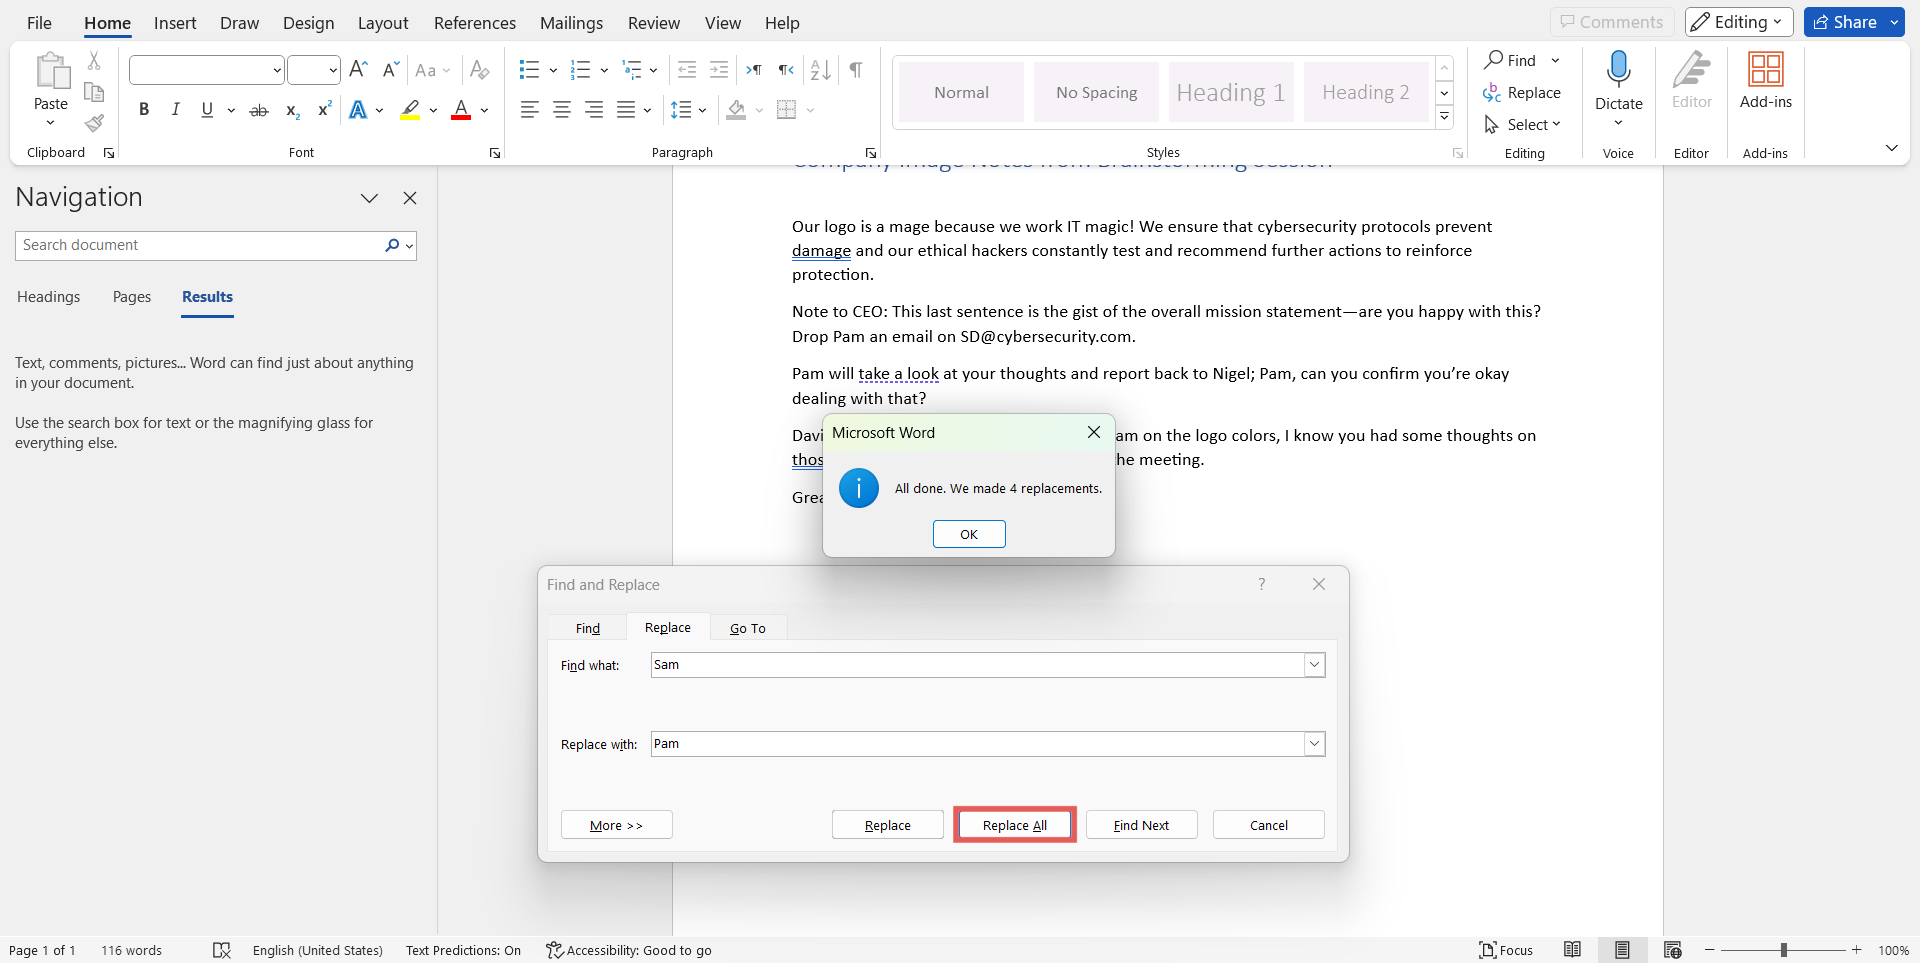
1. Click “Replace” from the Home tab. This opens a separate dialog box with two text bars. One says “Find what” and the other says “Replace with.” If you’ve already used the find function, you should see that “Find what” is already pre-populated with the last-searched phrase.
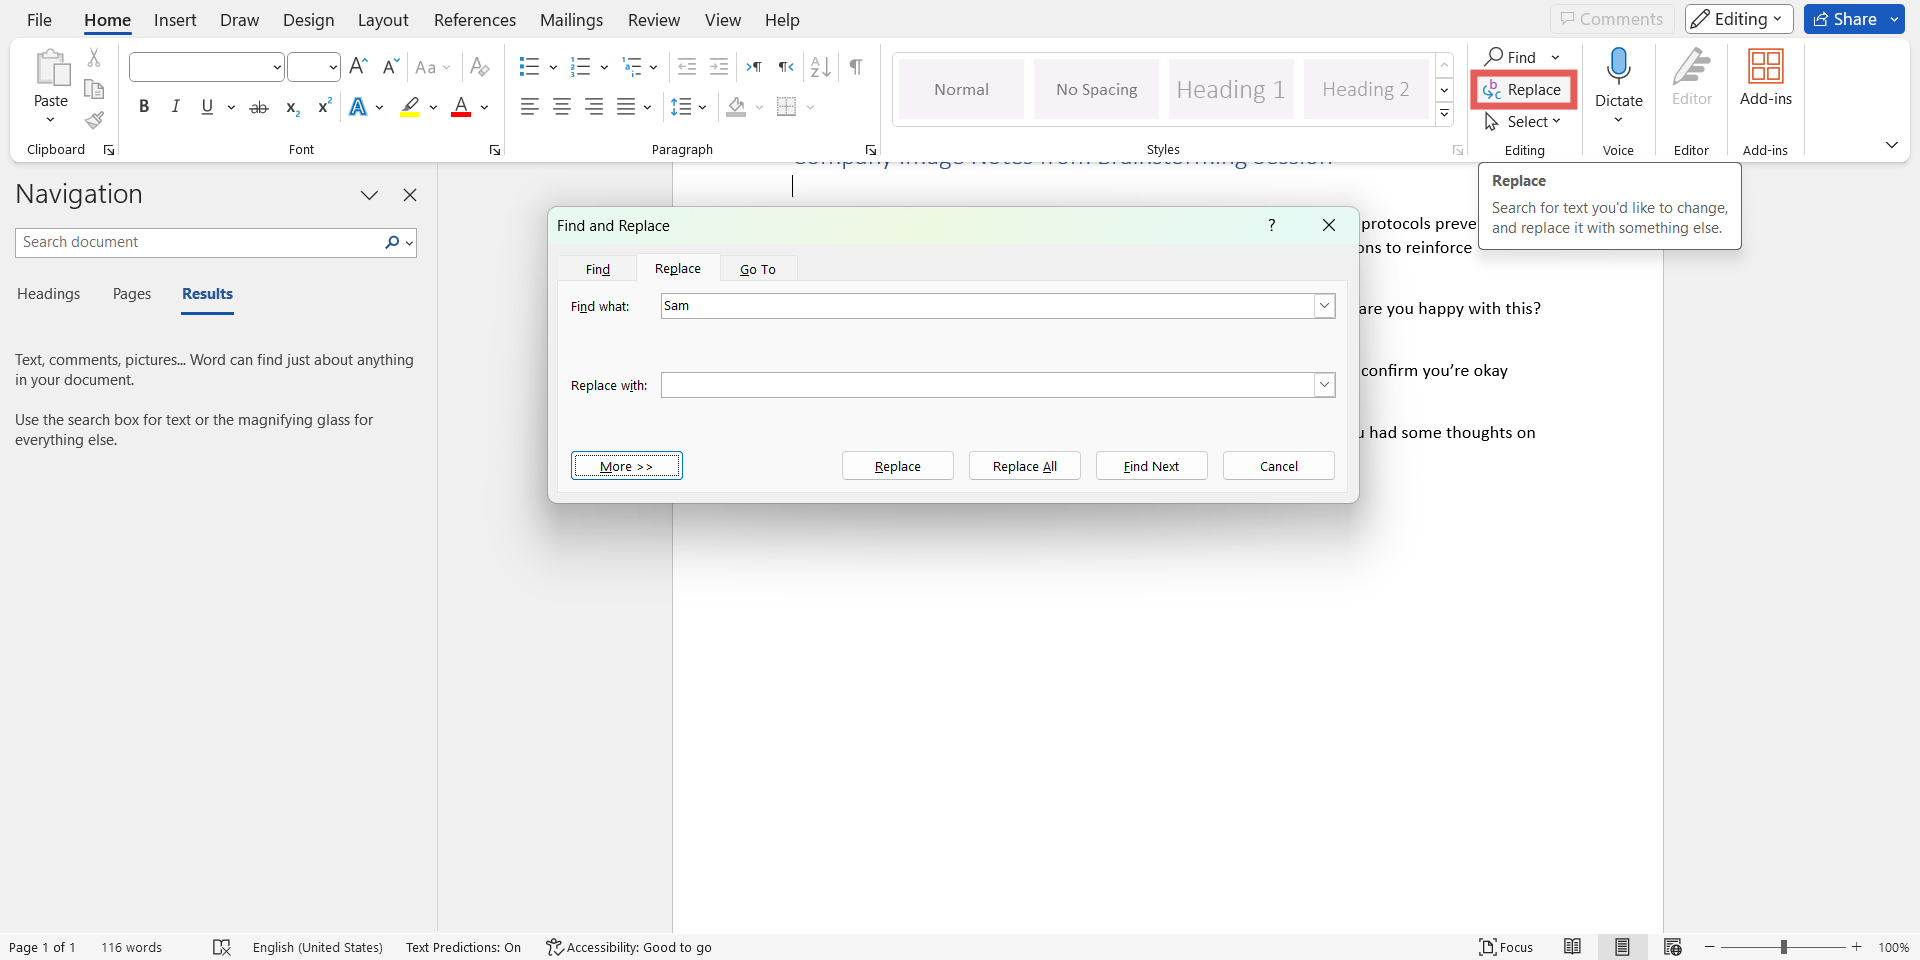
2. Enter the text you want to change into “Replace with.” In this example, Sam's name is actually Pam, so we need to change that before this document is emailed to the team.
3. Click “Replace All.” This transforms every instance of the incorrect text to the correct word or phrase.
You also have the option to “Find Next” and “Replace” which allows you to change instances one by one. This might be useful where a changing word is also part of another correct word. For example, changing “Able” to “Willing” on a “Replace All” function also changes “Available” to “Availwilling.”
In the below example, the user wanted to change the word "mage" to "wizard". They used Find and Replace, then Replace All, but this also changed the words "Image" and "damage". Checking instances one at a time helps prevent potentially unprofessional errors, but still saves time by changing a word or phrase with a single click.

The replace options are also always available from the aforementioned Navigation panel. There is a dropdown menu next to the magnifying glass symbol. This menu includes "Advanced Find," "Replace," and several other functions for managing and changing text.
Find and replace shortcut keys for Windows
Learning how to find and replace in Word is even simpler with shortcut keys. Press control + F to open the Navigation panel. This is the “Find” shortcut and will automatically move the cursor to the text box in the Navigation panel. From here you can use the drop-down menu for more advanced options including “Replace.”
Find and replace shortcut keys for Mac
Microsoft Word replace and find options are a little different on Mac devices. Use control + H to open up a "Find and Replace" sidebar with all the relevant functions present.
Find and replace symbols in Word
Find and replace is useful for managing a range of symbols. For example, if a document has double spaces, you can quickly use the above steps to adjust this. Go straight to “Replace,” type a double space in the “Find what” box, then a single space in the “Replace with” box, and hit “Replace All.” This ensures consistency across the whole document.
How to find and replace special symbols in Word
Certain symbols aren't on every keyboard, but you can still use the find and replace function for these special symbols. Examples include footnote marks, em dashes, and even paragraph breaks.
Follow the usual steps, and select "Advanced Find."
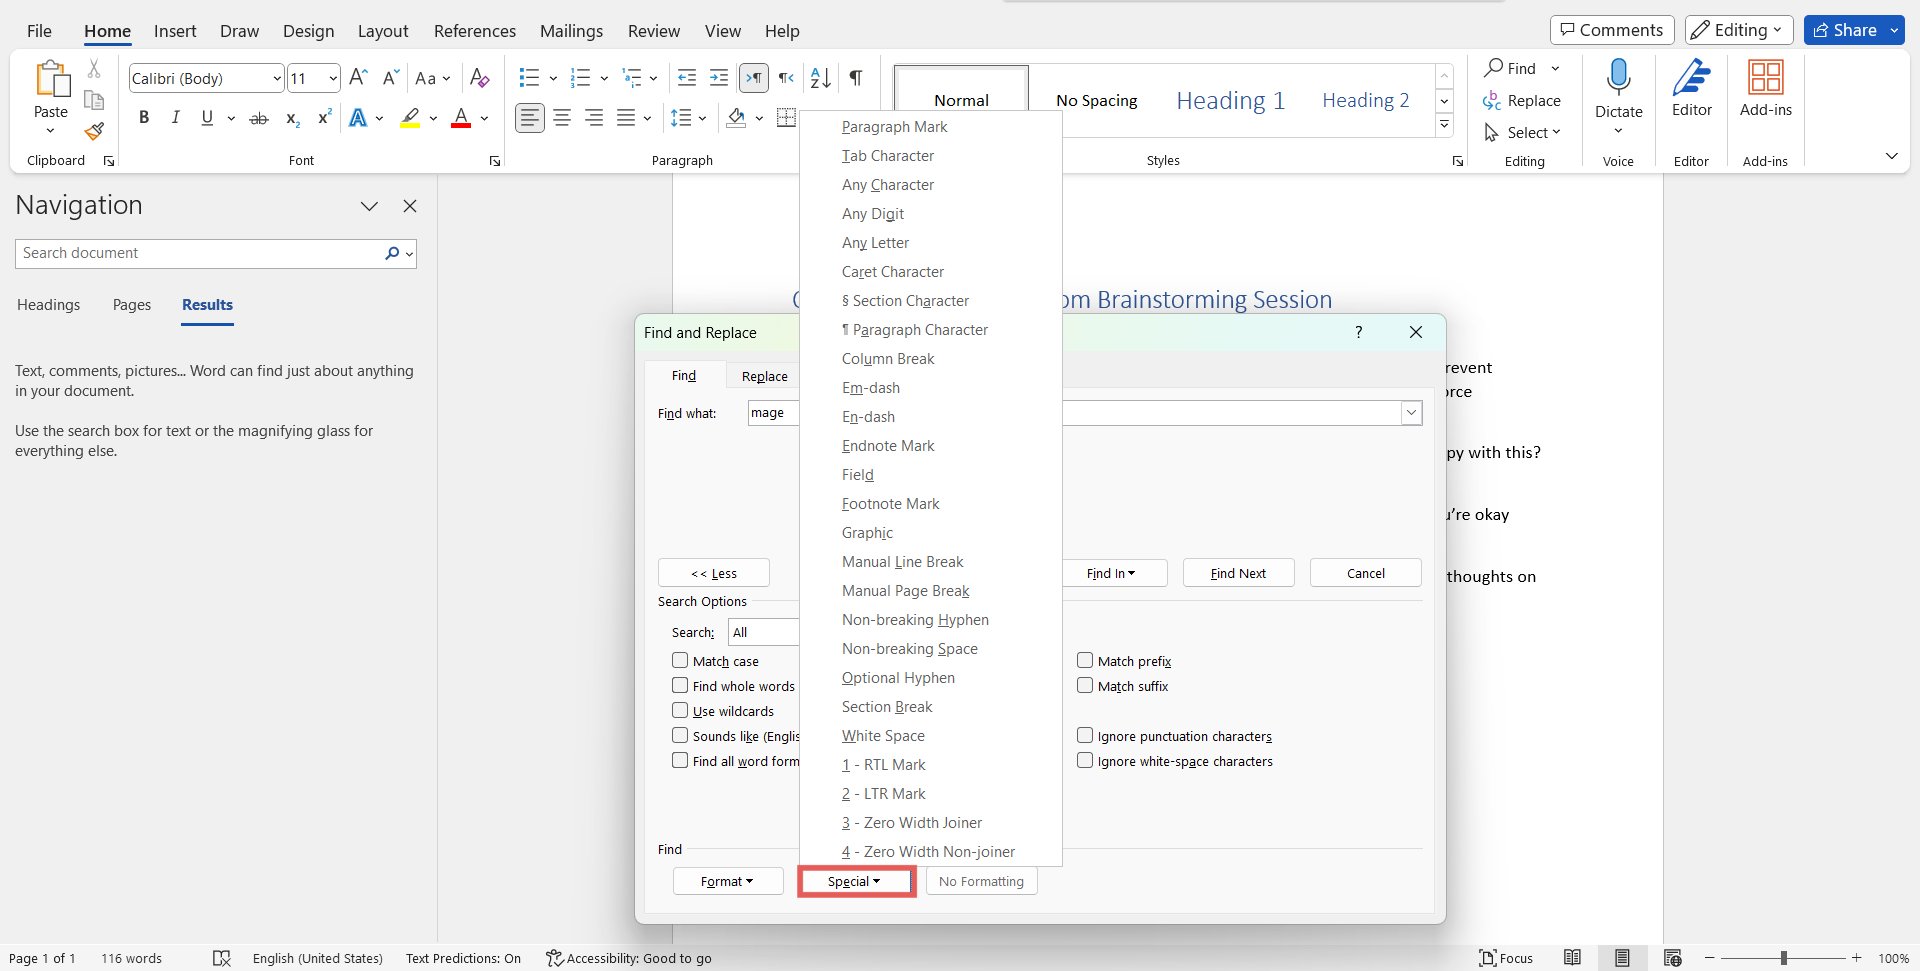
In the dialogue box that opens, click "More."
Click "Special."
Choose from the list of characters or functions in this list.
Note
Not all characters are listed in the "Special" list. If the character you want to search for doesn't appear here, simply insert it into the text using the "Insert" menu, then copy and paste it into the "Find what" text box. Don't forget to delete the extra character afterwards.
What are some tips and tricks for using find and replace in Word?
As well as searching for special characters, you can use "Wildcards" to search for less specific text within a document. For example, you might want to find all instances of three letter words beginning with "S".
Go to the navigation panel.
Click "Advanced Find" from the dropdown menu.
Click "More."
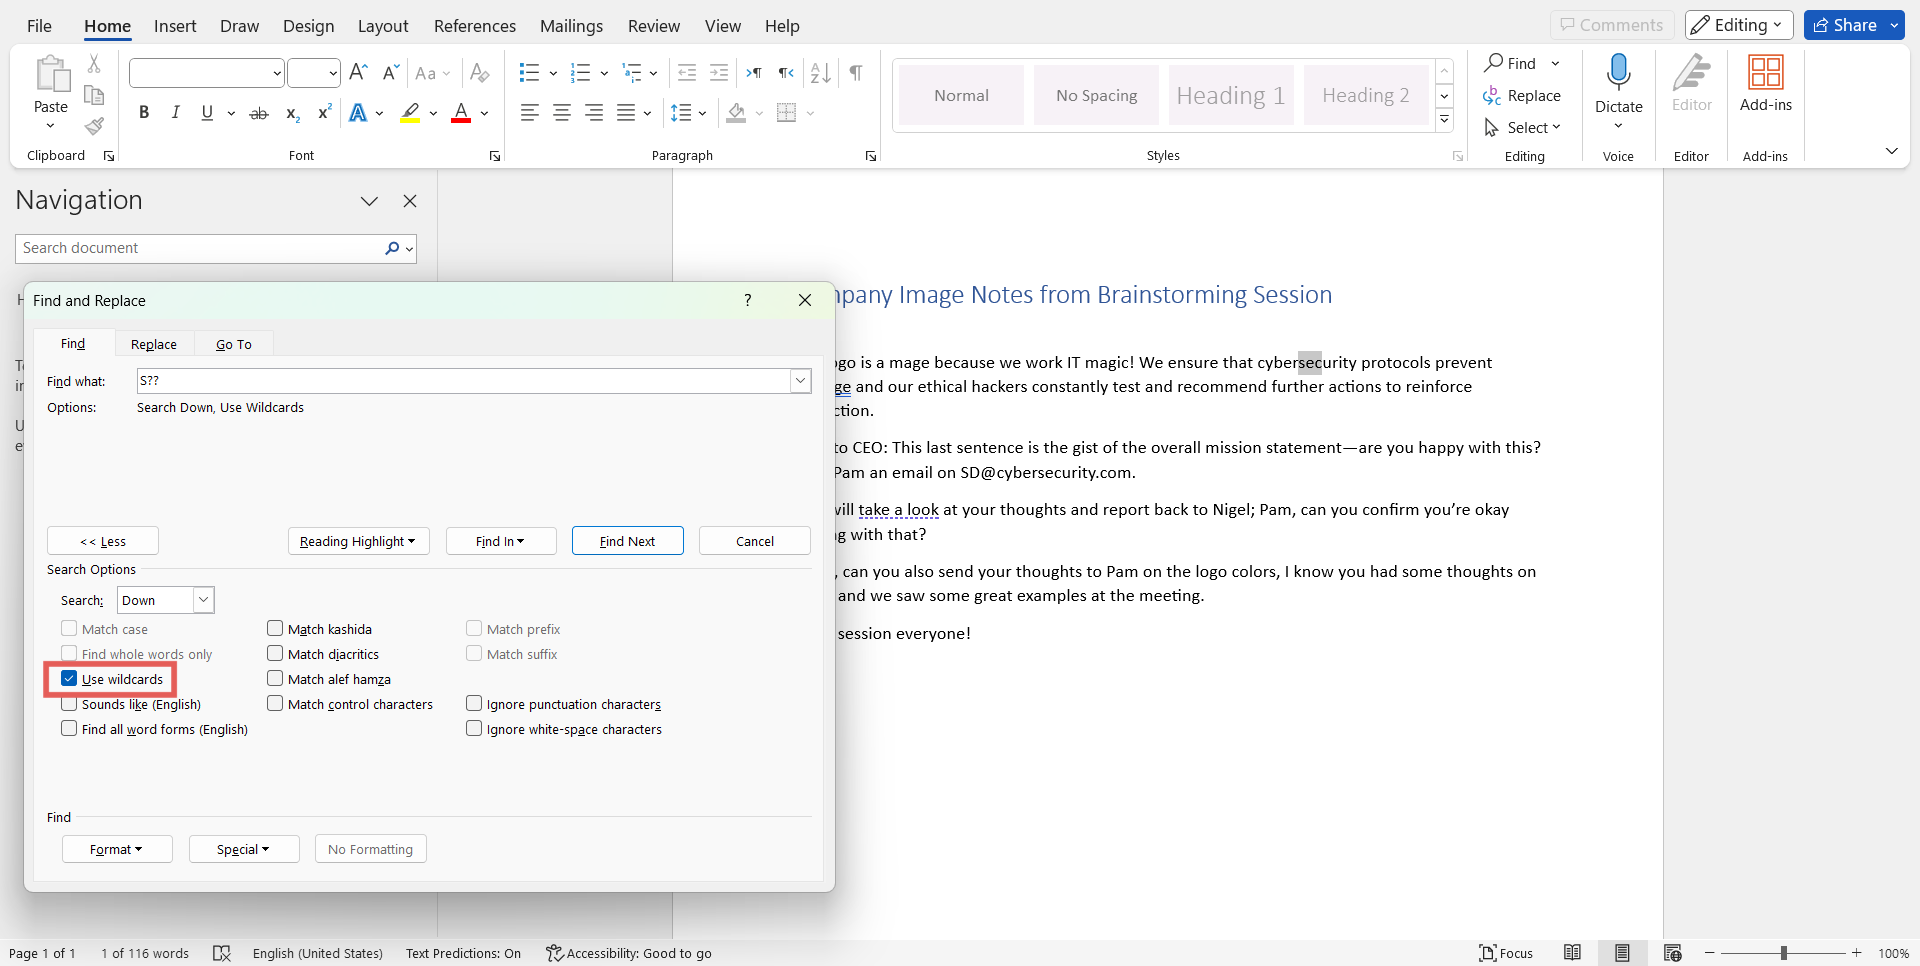
Check the box that says "Use wildcards."
Use the "Special" menu for a list of wildcards, including using "?" as a filler for any character.
In this example, we've typed "S??" in the "Find" box and the tool will now find every instance of three letters beginning with "S."
Other wildcards include looking for words that begin and end with certain letters, words with certain letters in but not others (for example A and E but not U), or excluding certain characters from the search.
Use find and replace for digital document efficiency
Streamlining content creation helps businesses get their blogs, social media content, and other resources in front of prospective clients faster. Learning to find and replace text in Word is one way creatives can work faster and smarter.
Check out these other guides on how to best use Microsoft Word: